
… mostly. I’ve failed to achieve the $20 Anova since the heating element price jumped almost 10x. I planned on using the one that costs $1.50, but it was zappy and splodey, so scratched that. This project felt cursed, it’s one problem after another. But I’ve spent a lot of time designing in Fusion 360, and writing codes. Weeks worth of work, and those are sunk cost. I want to see this through.
As posted in Build Log 3, I have soldered all the components and all the connectors, after my 1mm nozzle arrived, I decided to redesigned and reprint the enclosure so the new parts have their proper mounts. I have to reprint the bottom part because of the new water heater anyway. And oh boy 1mm nozzle is fast, 0.5mm layer height. Cut my 12 hours print down to 6 hours.
After that’s done. Putting it back together, that god-dammed Fotek SSR decides to bite me in the ass… again. That shit leak current. During testing I noticed the water temperature kept on rising despite it has reached the target temp. So I stop the PID. Still rising. Kill everything. Put the main wire through an amp-meter, it pulled 3 amp when idle. It’s only supposed to power the ESP32. ESP32 doesn’t need 3 amp on 220V. But when I turn on the PID I saw the current draw jumped to 6ish amp. So confirmed FOTEK is the problem. Some leaks are common with SSR, but 50%?!

The very next day I decided to test it with one of my good SSR. It’s a dual SSR, so quite an overkill, but it’s the only non-Fotek SSR I have. Night and day. 15mA on idle, 40mA when I turn the pump on, and 6-ish amp when everything is on. Which is about right, 1500 Watt / 240V = 6.25 A. MK3 is finally done.
Next post: Build Log 6: Build Guide.

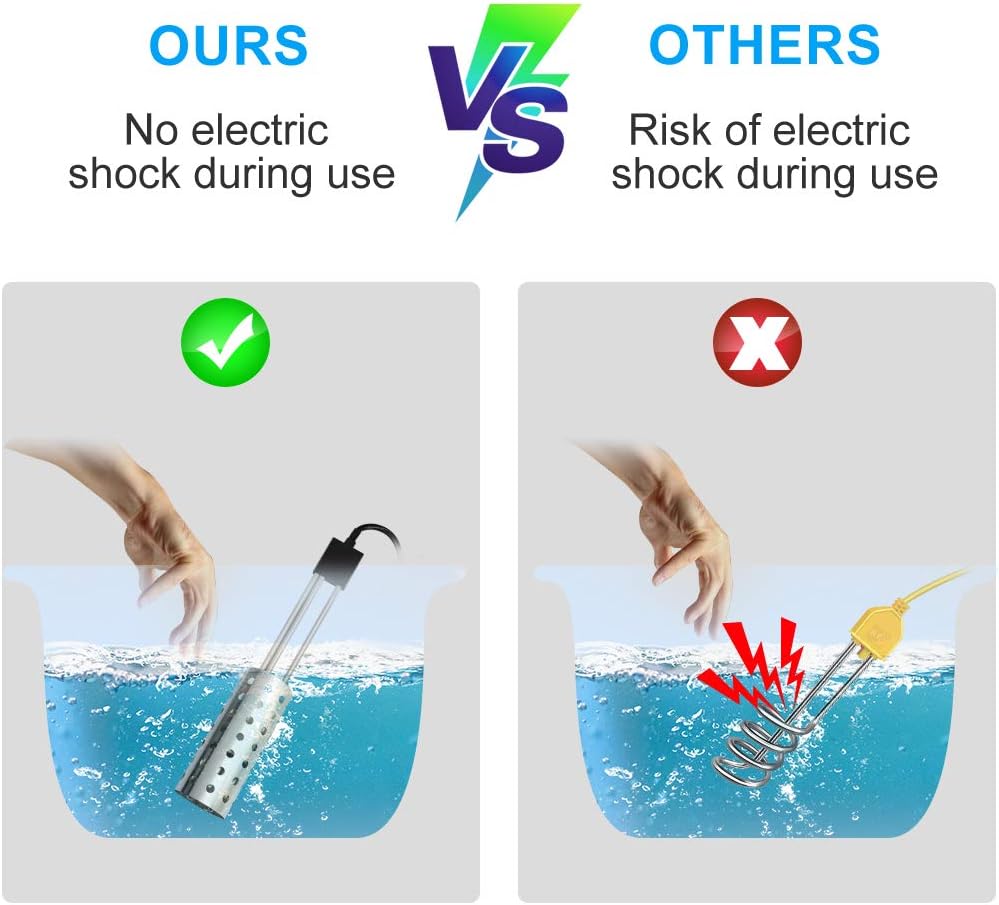
Just a quick update, I’ve figured out what I want to do with the water heater. I bought that pictured thing, which I believe is a spare part for a water boiler or something, costs like $13. I’ll do wiring myself, so I know for sure that it won’t electrocute me. This image shouldn’t never exist as a commercial product. Search on Aliexpress, led me to products that has a DO NOTE TOUCH DURING USE warning in their description. And it’s a 3000 Watt water heater, insta death. I’m done with those cheap-ass water heater.
Putting it together was simple enough. Put AC wires in, ground included. It has a DN25 pipe thread, so I just design and print a thing with that thread to surround the exposed wires, and enclosed it with epoxy resin to waterproof the wiring. Works like a charm, completely submersible, no more splodey things. And it’s 1500 Watt.


Listed is the problem happened in chronological order.
1. 5VDC power supply module
You know that cheap-ass PSU module that’s scrapped from other things and sold on marketplaces, yeah. Got it, tested it, it works, screw it in, plug it in, then it stopped working.
Solution: noticed that I have a pretty small 5V 3.6A power brick, it still fit in the box, so I’m going to use that instead.
2. DuPont connectors aren’t stable enough
You can see it on the design post, I plan just mounting the ESP32 upside down, crimping female DuPont. It’s too unstable. The screen is flickering. Encoder will not detect turns most of the time.
Solution: crimp JST plugs on the parts, and solder everything on perf-board.
Downside: I did not plan my positioning tight enough, so it’s too far apart, too large, and awkwardly mounted on the designed mounted parts. Messy but everything still fits inside.
3. Fotek SSR cannot be driven by 3.3V
Despite what it says on the label (IIRC, 3-25 VDC). Despite the LED lit up. It cannot open the gate at 3.3V. I’ve mentioned how terrible Fotek SSR was multiple times. But it its dirt cheap, and I already have some around. I’m not going to get a better SSR for this. There are two ways to go about this.
First, the easy but may kill the ESP way. Splice the 5V to + on Fotek, and - to a pin. So setting the pin to LOW will trigger the SSR and turn on the heater. A quick google will tell you that some pins on the ESP can handle up to 6V. But on spec, all pins are limited to 3.3V. This worries me, I believe by doing this, if (or when) the ESP fail, the SSR will remain triggered and it’ll become a fire hazard. So I went with the second solution, the “right” way.
Which is adding a MOSFET as a relay to control the 5V. So I have the ESP to control the 5V for the SSR that control the AC line. it’s like relay on top of relay.
4. Water heater isn’t grounded
Once everything is fixed and device is up and running, I did a test run, and want to confirm the water furthest away still has the same temperature, I felt electric current when pulling out the type-K probe. Curious, grabbed my test pen to confirm, lit up like a Christmas tree. With the amount of projects using these out there. I honestly cannot believe people hasn’t noticed this problem yet. After confirming that, a quick google led me to this water heater on Amazon, “no electric shock during use” was literally in one of the pics. JFC!
Solution: grab a piece of wire, attach it to a metal thing and ground. Problem solved.
5. The water heater goes POP!!
It exploded! (the hero image) After #4 is fixed, I went on testing another thing, only the coily part that is submerged in water. Because I plan on using a wide but low container, I don’t want to use too much water. After 15 minutes or so, the LED goes pop, plastics melted. Everything else still works okay, though I noticed the ESP kept on restarting. Seems like the water heater has shorted something. To the bin it goes.
Solution: back to the drawing board. Hopefully I have something to update...

I am forced to take a break from Project Katara. Pictured above, this blog suddenly broken for whatever reason. As I finished writing the next build log, I want to post it, I just notice that it’s broken. Not DNS settings, I’ve tried other paths, DNS are fine, FTP is still up and running. Tried re-downloading Bludit and overwrite the core, still messed up.
I have backups both on server and behind Bludit admin, but they’re old. The ones on the server stopped backing up because my host disabled php’s zip during one of their maintenances. I never notice this until today. I’ll fix this after I fixed the blog.
I noticed that I can upload a clean Bludit and have a new installation up and running without issues. So I just copy everything from bl-content over. Broken again but in a different way, /admin led to 404. So something inside the contents are causing this. Let’s do over, go slower.
Clean install, move my custom plugin and theme, all good. Next just copy everything from /bl-contents/pages and /bl-contents/databases (except for the plugins database). It works. And since all of my pictures I hosted it on imgbb, I’m done. All good. The broken copy is still available on /blog-broken, but I don’t think I care enough to do a post-mortem, it’s there if and when I feel like doing something about it.
Everything is sorted within 15 minutes. Can’t even imagine what I need to do if something like this happen to a WordPress blog, which is an argument for paying to be hosted in WordPress.com, or you know, use Bludit.
I need (and want) to continue working on Project Katara.
Not much to write. Now that the parts have arrived, I can find most of the exact models on GrabCAD, and the ones that aren’t available online are simple enough to design myself.
- R10 800l/h Aquarium Pump
- ESP-32
- IEC320 C14
- 0.96” OLED
- KY-040 (don’t need the model for this, I just need to cut 7mm hole) — designed my own a knurled knob though.
- Toggle switch (also no model, 16mm hole)
- 1000 Watt submersible water heater (poorly designed, can’t find my exact measurement in GrabCAD, but I need to design this to align the water pump)
- Chinese scavenged AC-DC power supply 5V 2A (just need to add mounting points)
I’ve split the enclosure into 4 parts,
- bottom for mounting the pump, sensor, and water heater. Screwed on to centre. 7.5 hours print.
- Centre the main enclosure. 12 hours print.
- Top is the lid, snap on to centre. 5 hours print.
- Clamp to clamp this to a container (the water bucket), and it also clamps centre and bottom together. 2.5 hours print.
- I’ve also added 0.2mm gap so I can add a transparency plastic between bottom and centre, you know the ones we use for 3D printed face shields. This is to protect the electronics from hot water vapours.
Total: ~27 hours of print time. I’m getting Volcano hotend + 1mm nozzles.
To be continued...

Ever since I saw the Anova tear down (as mentioned towards the end of previous post), I can’t get it out of my mind. I bet I can build that. So, as of a couple weeks ago, I started prototyping. I’m going whole hog. Got new parts, most of them anyway. I’m not pulling parts out of MK2, it is still actively used. The goal for Project Katara is $20 Anova, the whole thing, no rice cooker. And I aim to make this like a “commercial product”, you know, as far as DIY goes.
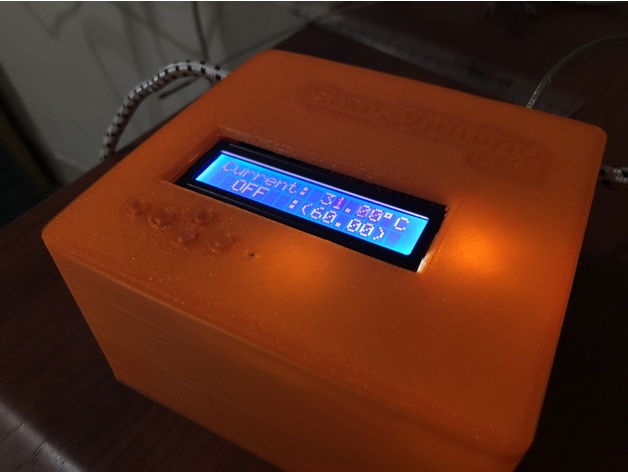
First the name, I love naming my projects. If it is not obvious, Katara is the water bender from Avatar The Last Airbender. The basics of this project is ESP-32 as the brain. Submersible water heater as the heat source. And an aquarium pump to circulate the water. A complete Sous Vide, aka the immersion circulator. The pump is key, if we don’t move the water around the heater, the water around the heating element can be boiling while the water an inch below it is still at 30ºC. Hence Katara.
Next, the prototype pic above. Since I already know the Sous Vide part, running PID on a submersible water heater based on the input from a thermal sensor, I need to test and prototype the things that are new to me. Mainly the rotary encoder and ESP’s Wifi libraries.
- In the middle is the ESP-32, the brain. I missed the WiFi interface of MK1, kinda annoying going back and forth to monitor the temperature and making sure the thermocouple stay in the water.
- KY-040 Rotary Encoder on the left. Another drawback of MK2, D-pad buttons are terrible interface to set temperature. Rotary encoder because that way I can have interface continuity between WiFi and the device
- Spare 16x2 LCD, already have the 0.96” OLED on order. Seen there is the encoder running to set the “target temperature” and the local IP address of the ESP-32.
The basic of DIY Anova has been done multiple times and there many guides on Instructables and YouTube, a temperature controller, small aquarium pump, and a submersible water heater. However, for some weird reasons most (if not all) of them use a bang-bang controller that’s really meant for a cooler than heater. Seriously, like $5-10 more you’ll get a PID controller. See the graphs below, bang-bang is far from ideal for a Sous Vide.


To be continued...
Another thing that’s “inspired by” Instagram ad.
So I pop open Fusion 360, model it from the picture, and it’s done within 30 mins. After about 30 min print, pop in the magnets, BAM saved like $10 or however much it was sold (I don’t remember exactly).
Instructions is in the thingiverse page.
Well, not necessarily an upgrade from MK1, but more of a remake on the same thing, minus WiFi and App, but plus LCD and buttons, and now that I have a 3D printer, a perfectly fitted enclosure. It is a simplification. I can’t use the same code because the Spark folks has drop support for the Core, took me like an hour to get “blink” running on it. It’ll be faster to remake it from scratch. And using a self-signed app is annoying for others in my family that could’ve use this as well.
That said, I made this with 100% spare parts, so personally I spent $0 on this. I bought an Uno clone and LCD shield for “prototyping” purposes, but it never left the anti static bag. It is always faster to jump directly prototyping on the board I actually plan on using, zero code adjustment.
The longest part of this build is waiting for the enclosure finish printing. If you need a guide for this, just follow the Sous Viduino by Adafruit.
Links: enclosure and code. A quick breakdown on my specific setup:
- Arduino as the brain, and Uno because I want to use the LCD Shield.
- LCD shield to simplify things. I’ll have buttons for interface. Up / down to control the temp by 0.5ºC increments, left / right control by 5ºC. The set button to start and stop the PID. 1
- Temperature sensor as PID input, I use the type K with MAX6675, because I bought quite a few of it right before people jump to MAX31855. Even the DS18B20 will work as well.
- Fotek 40A SSR is fine, it’s good enough to control the rice cooker. Utter shit as a product, I wouldn’t trust it as mission critical projects, but I already have 4 of them because they’re like less than $2 each.
- And I can’t remember the exact module code for the Aliexpress AC to 5VDC module to power the Arduino from the same plug. 12VDC into Vin pin would be better, but regulated 5V into the 5V pin is fine.
Downside with this rice cooker setup that you’ll need to make sure that the temp sensor is in the bath when the PID is working or you’ll boil whatever you’re cooking in the bath. I have one occasion where the probe pop out for some reason and the water reached 70ºC when I wanted 60º.
I plan on doing something like a “thermal runaway” protection in the code like in 3D printers. See if the temperature isn’t rising after a certain time while the heater is “on”, kill everything.
Also, I saw this Anova teardown, it is so simple. That thing is literally the same as this project, but instead of rice cooker, just add a $2 submersible heating-element, and a motor to “circulate” the water. I see MK3 in the horizon, another perfect project for #CoronaCraft.
Footnote
1: This LCD Shield is terrible idea, it is super annoying to use. I'd 100% use a potentiometer to set the temperature for MK3. ↩