After Mac’s Safari 13 completely dropped the extension feature, thus uBlock no longer works there, I want to move away from Safari. Which is a bit tricky because Keychain no longer works with other browser, so step 0 for moving away from Safari as default browser.
On iOS all other available browser also available with all the basic required features. Tab syncing, and what not. Password management isn’t an issue on iOS side because the way iOS handle password submission, and you can set the default password manager in the Settings.
Enters pass. Pass is a developer friendly password manager that uses GnuPG for encryption. So simple that the basic interface for it is just a plain command line, we’ll need to use other extension / plugins for it to work seamlessly. Pass also use git to handle the syncing, pro tip: GitHub now allows private repo 😉
After making and using tiny touch for awhile now, I’ve noticed that the M3 bolt that screws into the flag is a design flaw. At some turns you may screw it not straight in thus it may snag on the hole, and the printer vibration can loosen the screw and messed with the Z offset. So, for the MK2 I’ve redesign the body and the flag so the M3 bolt and cap are no longer needed.
And since I have spare parts enough to make a back-up probe, I decided to just make one. I use the leftover left servo, and mirrored the body. This time it is way easier, most time spent was to desolder the JST connector on the endstop sensor.
Here are the links to part 1 and part 2 in case you missed it. The final part of the Anet A8 upgrade series, the final form. This will be the only upgrade that I put a price range because all of these upgrades combined will cost more than the printer itself, although to be fair, you kinda just built yourself a new printer if you did all of these.
Update: I completely replaces #2 and #4 on this post after further research and testing with my own device.
1. Auto Bed Leveling ($5 - $50)
This one is a no brainer, removing the need to bed level is a huge convenience bump. It can cost you from $5 (DIY) all the way to $50 (an original BLTouch). Honestly, even though the BLTouch is the “be all and end all” of the Z-probe sensor, because it works on all surfaces including glass bed, but it costs 1/3 of an Anet A8. Meanwhile 3DTouch ($10 - $15), the clones, people have had mixed reviews.
After the stock proximity sensor made my nozzle crash into the bed on multiple occasion, I don’t think any of those proximity sensors work on glass bed anyway.
Which leaves us with DIY, there are many options. 3D printer community is filled with creative folks by definition. Starting from the jankiest where they just stuck a button onto a servo, all the way to making it as good as a commercial product. These ones all boiled down to use an optical endstop, a flag to trigger the endstop, a flag pole, and a servo to stow and deploy the pole.
Here’s a list of some DIY options:
Anet A8 Optical Z-probe: the very first probe I actually made, it’s not pretty but mounted very close to the stock nozzle.
BFPTouch: arguably the original commercial looking DIY z-probe
KeyTouch ABL: You’ll need to remix it from Ender 3 to Anet A8, this is still very new (I haven’t found any Anet remix yet). Simple and smart.
2. Extruder & Hot-end ($120)
Titan Extruder & E3D V6, easy. Next!
LOL, no. Original titan extruder cost like $55 without the motor, and original E3D V6 will cost about the same. That brings the total close to 60% of the whole Anet A8, just for the extruder + hot end kit.
But, we’re on the right track. I highly recommend the bowden option if you’re willing to scratch TPU and NinjaFlex out of your filament choice. There are a lot of of guides and mounting options for the titan and v6 for all kinds of printers out there. They’re very good, easy to assembly, and so many cheap clones on Aliexpress. Before you get on the high horse, Anet A8 itself is a cheap clone of a Prusa printer. And unlike the 3DTouch, people has better luck with these.
E3D Hemera is currently the best upgrade option for the A8 hotend & extruder replacement. No clones available for it, but give it a bit time. I no longer consider a bowden setup as an upgrade. It introduces unnecessary problems, and at best is a side step. I can print better and faster with A8 stock extruder than using a Titan + V6 bowden.
3. Metal Frame ($25 - $50)
There are two major option here:
EMT8: Cheaper option, like in the name, it uses EMT — Electrical Metallic Tubing. $25 according to the Thingiverse.
AM8: This one uses Aluminium 2040 profile (which is the same materials used on the Ender printers). I’ve bought the non-printed parts for this, got more than everything for $35 (I bought a lot more screws and T-nuts for spares and to attach other things). Check your local hardwares supplier, online doesn’t always mean cheaper.
Between the two, I’m leaning towards the AM8. It is lighter and more versatile, just slide a T-nut in and you can attach anything on the frame.
If you count the printing time, electricity, and the plastic cost of all the frame braces, these metal frames aren’t that much more expensive.
4. Main Control Board ($50)
This is the section where we starts to see diminishing return on investment. I mean, sure if you break your board, it caught on fire, or something, might as well upgrade to the RAMPS 1.4 (plus Arduino Mega of course).
While cutting and re-crimping your cables aren’t fun, RAMPS opens up a whole lot of flexibility. Option to get higher-end / quieter stepper motor driver. You’ll get an extra slot for another extruder (not really worth the mod effort IMO). And you’ll get a lot more space from Arduino Mega. On my stock v1.5 board I’m at the point of removing SD card support (which I don’t use anymore after Octoprint) from Marlin so it’ll still fit. IIRC, the default Marlin configuration for RAMPS only uses 20%-ish of memory. I think you can enable everything in Marlin and it’ll still fit.
That’s about it. You may still need the external mosfet (at least the one for the bed), because some RAMPS can also uses a sketchy parts and the connector can be just limited to 10A.
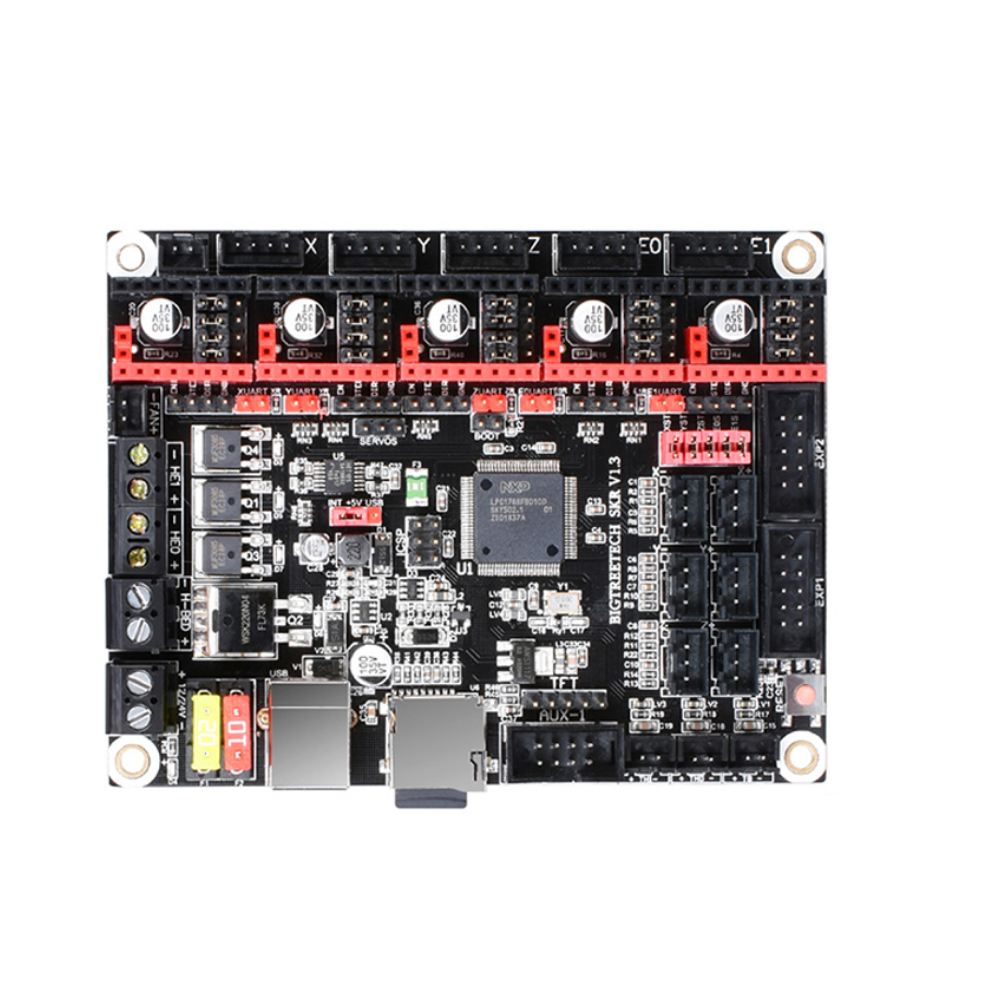
Why use RAMPS that's very likely to use sketchy and under spec-ed parts while you can get a 32bit board like SKR v1.3 from BigTreeTech for about the same price. And get the TMC2209s driver for it. Plug and play with UART interface, so we can adjust the current with a terminal or from the printer itself. And has option for sensorless homing incase the button was broken for some reason.
5. Linear Rails Upgrade ($40 / meter)
a.k.a BLVmod. This mod replaces the linear bearing to use MGN12 linear guide. Honestly, this feels like unnecessary upgrade unless you did all of the above upgrade and want to use two direct drive extruder and retain the print speed. I put the price per meter because I haven’t look far into this.
If you for some reason borked the Anet’s linear bearing (loose balls, or something), just get a DryLin linear bearing. They’re very smooth, quiet, and don’t have balls. Even before DryLin, I’d give this thing a go.
Bonus: 110/220 VAC Silicone Bed Heater
This is one of the most recent upgrade I made. I bought a bed insulation foam expecting that it’ll be enough to retain the heat with the fan going at 100%, or at least enough power to do PID for the bed. I was wrong, bed insulation helps a little bit, but not enough for PID tune.
I put this as a bonus because it’s quite crazy mod, especially for those who never play with AC power before. However this is a very interesting mod. The heated bed is biggest power suck out of any 3D printers, that’s why we did the mosfet upgrade, so the bed draws power directly from the power supply unit. Now by adding the 220 VAC heater, we also relieve the PSU off 10-13 amps draws by the heated bed alone. It means that the mosfets are no longer necessary, and the original 20A PSU will be plenty cool to run.
Conclusion
There you have it, this is the end of the upgrade series. At this point for another ~$100-$300 you’ll get an almost entirely different Anet A8. Cost wise, you’d get a better printer out of the box if you get literally anything else, you’d definitely get an Ender 3 for under $250.
However, the lesson learned from upgrading the Anet A8 is priceless. From doing most of these upgrades myself, and from researching and thinking about what I would have done to the Anet, I’m quite confident that I’ll be able to build my own 3D printer from scratch with my own specs at cost.
As I said in my review, Anet A8 probably the worst 3D printer out there, but they’re the cheapest and the best 3D printer to learn a lot about 3D printing.
Here’s the continuation of the Anet A8 Upgrade series. Here’s a link to part 1 if you missed it. This part will basically just a list of printable objects from Thingiverse. I’d consider most of these as “free” upgrades. I know you still pay for the filaments and electricity, but I’m not printing objects professionally. Like unless you’re an Uber driver, you’d just lump your car’s fuel cost as living cost, right?!
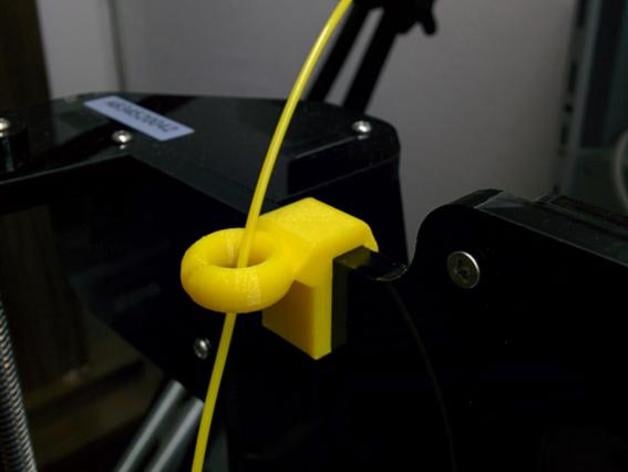
There are plenty of these things in thingiverse, but the ones that sit right above the extruder doesn’t make any sense to me. They’re big, hard to print, and doesn’t really help the filament to flop around the printer and making it very likely to snag on something. The one I linked to is great. Easy to print, sit right in the acrylic frame around the top.
Save your thumb. You’d feel the need for this after the very first time loading in the filament. There are plenty of other designs, I actually printed this one, it’s easy to print and doesn’t require any tight tolerances.
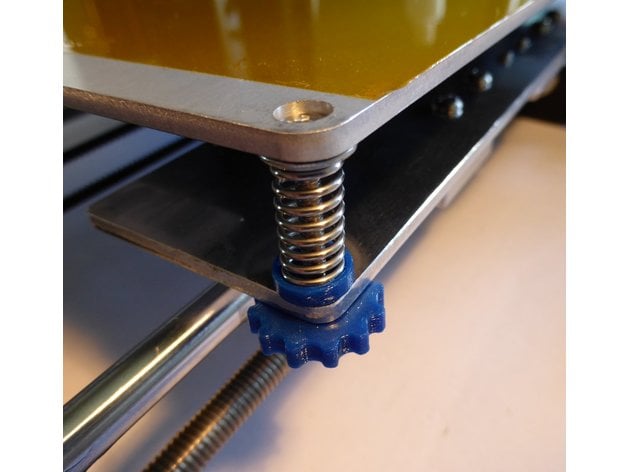
The wing-nut that Anet came with were terrible for bed leveling micro-adjustment. Luckily, for some reason I didn’t need to drill out my H frame. Again, there are many other design, I chose the one that seems easy to print.
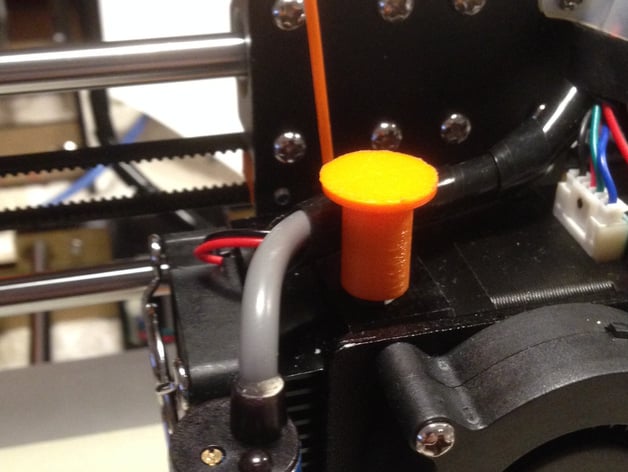
One of the very first major mod I did on my Anet A8. Changing filament blind was the major design flaw on the A8. I mean it has a lot of flaws, and cut corners where possible, but the blind filament loading is a design problem.
There are other options, but most of them (if not all), requires the complete removal of the heatsink. That is just doesn’t compute in my head. The even crazier ones were the one that put the fan above the extruder motor, what the heck are you cooling from there?
For the next couple upgrades, I highly recommend getting a softer fiberglass timing belt. You may need a replacement while doing these upgrades anyway.
Although the chain seems like just for aesthetics, but in my case specifically, the hot-end heater wire out of the box were too short for normal routing (where you route it over the right of the LCD and over the top hole), I needed to flip the mainboard upside-down, which makes it very hard to reach the SD-card.
Adjustable belt tensioner is a feature that should be available out of the box. And you can replace the stiff belt while installing the tensioner.
Alternative tensioner thing. I think this is a good alternative if your printer is not enclosed. Easy to install with current setup.
6. Y-axis Upgrades
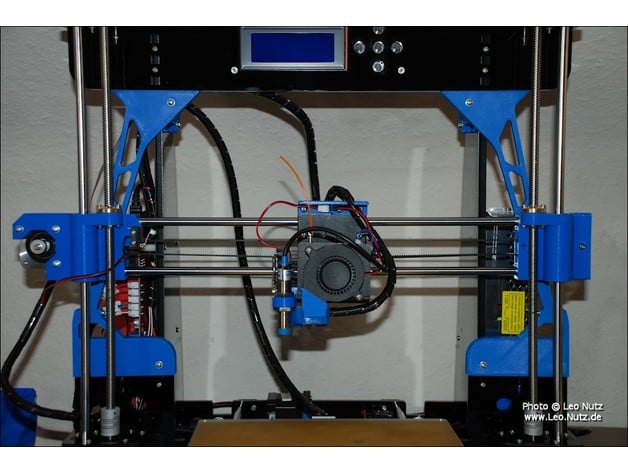
Flipping the H bracket (pictured above). And replace the belt clamp while you’re at it.
Belt tensioner. Again many other options, I think this one has the largest thread thus easiest to print.
Y-axis chain. I actually put mine on the right side so the nozzle will never crash into the clip and the chain. Just mirror the mount and choose the thinner H frame remix to safe some plastics.
With the Y-axis chain will completely remove the strain on the molex connector. This will remove the need of soldering the wires directly to the bed.
Personally I haven’t printed any of these, they’re way at the bottom of my list. These things take forever to print and with the exception of the hulk brace, I don’t think the rest are worth printing. The lower frame is going to be as stable as the table you put your printer on, if your Y tension is bending the frame, then it’s too tight anyway.
There you have it, the printable upgrades to Anet A8. Next part, the last part, will be the ultimate / crazy upgrades to the Anet A8, making it the ideal printer. Making it the ideal 3D printer, because at that point, you will understand every little nook and cranny of the Anet A8.
Final note: please do not use these “anti-Z wobble” things that add a bearing to the top of the threaded rods (like this one). Those threaded rods are meant to have a slight wobble, that’s where the guide rods and X-tensioner comes in. Here’s how you should install the threaded rods in the z coupler.
I’m going to split my Anet A8 upgrade recommendations up to three parts. First, this post, is the most important upgrades, a must have, for safety reasons or super conveniences. Next we’ll have the printable upgrades, and then we’ll go into very nice to have upgrades, the ideal Anet A8. It’s the upgrades that make it hardly can be called Anet A8 anymore.
1. Marlin Firmware
You may need USB ASP programmer to install the bootloader. It’s less than $1. Many guides / tutorials skip this step. Feel free to jump straight into those first, when you fail, you need the USB ASP.
Installing bootloader: text version | video — there are guides that’ll show you how to make Arduino as USB ASP, please, just get the programmer. It’s super cheap, your Arduino would cost more if you shorted the board.
Installing marlin: video — there were many, but I think this is the best one to follow.
This is the best upgrade for the Anet A8. A bit tricky if you’re not familiar with Arduino or electronics in general, but it’s just costing you $1 at most.
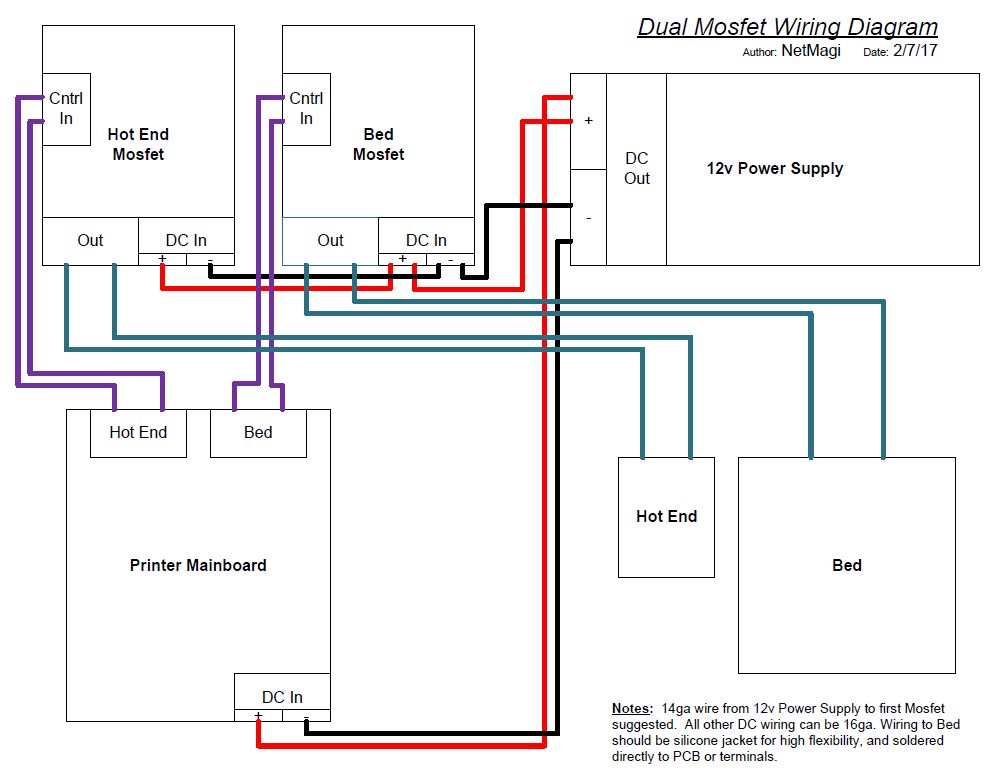
2. Mosfets
It’s basically offload the high current delivery off of the mainboard, and pull directly from the power supply unit. I haven’t done mine yet, last week Aliexpress was having a tiny sale in their site, so I decided to wait a couple of weeks. I mean it’s been printing fine for the past year or so, right?
Personally, I think this is optional, it will make the printer runs cooler (and all the 30A PSU I've seen has a fan in them anyway. The thing is, although the stock printer are pushed right on the limit, it hasn’t gone over yet, otherwise it’ll fail a lot sooner and at a higher rate. Anet’s main failure points are on the board, and that’s what the mosfets are for.
That said, I'm going to upgrade mine. I've just ordered a slim 29A PSU, which has nicer look than others. And there is another way of upgrading the PSU, that is running all the heating element on one PSU, and the rest of the printer on another. Read more about this setup.
Oh, and here’s a thing to print for your PSU. I already ran my A8 on a fused power strip with a switch. I’ve been using that switch instead. I don’t think it is necessary for me personally, but it’s a nice to have upgrade.
4. Raspberry Pi & OctoPrint
Get a rPi, 3+ is minimum, the most recent 4 would be even better.
30mm fan. I named mine PrinterPi for a reason. It’s running CUPS (2D printer server so I can print directly from iOS devices), OctoPrint, and PiHole. It’s going to be warm.
Raspberry Pi Camera. Easy to setup, even on DietPi. Cheap and tons of case / mounting point to choose from on Thingiverse. And you get to monitor the print from another room.
Touchscreen LCD (optional) — I haven’t decided to get this as well, but since I’m considering Klipper firmware, a screen is quite necessary. Klipper doesn’t support the buttons on A8 yet, a touchscreen to control the printer is required. At this point, Klipper is a none starter for me. I need the buttons incase something happen, and I need to move the extruder quickly.
Very easy, though not cheap upgrade. You don’t even need to touch the printer except for plugging in the USB cable. Not really necessary, but it’s a great thing to have, especially if you have Marlin installed. You can just use the terminal from there, very convenient.
5. Build Surface
Glass bed or Buildtak or the clones from Ali are fine. These are are consumables, not the glass of course. If you’re going glass, use borosilicate glass. It can handle the thermal shock from the heated bed.
I prefer the buildtak clones. It’s cheap, it works, and I don’t need to prime the bed prior to printing. Cleaning up the adhesive residue maybe annoying, but I did that like 3 times over the year of owning a printer.
There we go. I think these are the most important upgrade you can do to Anet A8. This concludes the first part of the Anet A8 Upgrade List, stay tuned for the rest of the series.
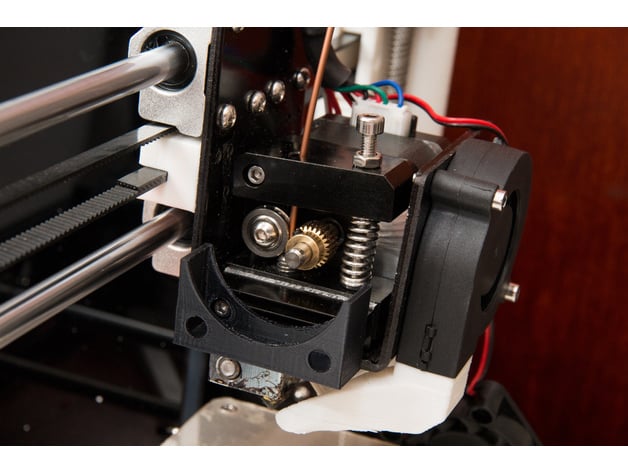
I made a thing. Well, I remix it, all credits should go to the original creator.
Bill of Materials (BOM)
Printables, one of everything, body, flag, cap, and mount. While technically the cap is optional, I measured the mount with the cap on. You can also use a slightly longer M3 screw. MK2 only requires the new flag, and body. The mount is the same.
Optical endstop (Aliexpress) — It’s cheap, nothing wrong with getting spares as you’ll need to de-solder it.
Tiny linear servo (Aliexpress) — R (right) version. I got a pair, local shop sells it as pairs. I think you can get away with L version if you just mirror the body, and possibly flip the servo angles. I have build a back-up probe with my L (left) servo, we can keep the angles. I can use it as straight replacement.
4 M3x12 bolts.
2 M3 nuts.
1 M3x20 bolts. Not needed for MK2
3 tiny screws. Like the ones for glasses, I use spare iPhone repair screws.
1m of 4pin wire. LED strip wire like this one works really well. I’ve tried USB cable on my previous z-probe too, too thick and stiff for my X-axis chain.
1 female 3pin JST-XH connector (2.54mm pitch). Though getting a pair can be useful for testing while working on this.
1 pair (male and female) of 4pin JST-XH connector, or 4pin Molex, or anything 4pin with 2.54 pitch really. I use molex cause that’s what I have in my spare box.
1 pair (male and female) of Dupont connector.
Optional: spare LCD cable, incase you fucked up cutting the 3rd wire. It consist of 10pin ribbon cable + 2 10pin IDC connector, if you want to get it as parts.
The Probe
Once everything is printed, it should be easy to put everything together;
Plop the flag into the body from the top.
Screw the M3x20 to the bottom of flag.
Pop the cap onto M3x20. Step 2 and 3 are not applicable for MK2.
Screw in the optical endstop above the flag.
Screw in the linear servo from the bag with the tiny screws.
The flag should move smoothly up and down (MK2 has better tolerances too). The servo is tiny and weak. Any snags will stall the motor. File down wherever it snags. I also add a little bit of electrical tape on top of the flag to make the flag more flaggy (?). I find that without the tape, the flag is not forward enough. The flaggy flag will cut off all of the light for the endstop.
The original recommends using neodymium magnets or spring, I just use gravity. I’d rather not weigh the servo beyond the weight of the flag and screw.
Next you need to de-solder the 3pin JST-XH on the endstop, and soldered in the 4pin connector (some bending of the 4th pin may be needed). And splice the power to the servo. As usual, black to G; red to V; and white to the empty pin.
The cables
If you use the LED strip wire like I do, it’ll be nicely color coded. Black for ground (G). Green for endstop signal (S). Red for 5V (V). Blue for servo signal. Straight forward crimping for this end.
The other end, crimp blue with one of the Dupont connector ( I use female because the JST connector for the other 3 pins are also female). The JST connector is a bit trickier because it only goes in one way and the crazy way of Anet board aligning things. So for this connector, following the pin out diagram above, with the hooks at the bottom, you crimp in black - red - green.
Next is the LCD cable, this one is easy but also easy to fuck up. Count to the third wire from red, separate it from the ribbon, cut it, and crimp in the male Dupont connector. ez pz.
Test and Confirm the Build (optional)
If you have a spare Arduino lying around, you can use this tiny-touch-test.ino to test and confirm your build. You can just look at the code for the pins connection.
Like in this clip, pop open the Serial Monitor and type in s to stow, and d to deploy. The internal LED should correspond with the endstop, the LED on Arduino turns on when the flag is up.
The Configuration.h File
#define Z_MIN_ENDSTOP_INVERTING false  // set to true to invert the logic of the endstop.
#define Z_MIN_PROBE_ENDSTOP_INVERTING false  // set to true to invert the logic of the probe.

#define Z_PROBE_SERVO_NR 0   // Defaults to SERVO 0 connector.
#define Z_SERVO_ANGLES {160,30}  // Z Servo Deploy and Stow angles
// please test and find the angle that works best for you.

#define X_PROBE_OFFSET_FROM_EXTRUDER -24   // X offset: -left  +right  [of the nozzle]
#define Y_PROBE_OFFSET_FROM_EXTRUDER -47   // Y offset: -front +behind [the nozzle]
#define Z_PROBE_OFFSET_FROM_EXTRUDER 0   // Z offset: -below +above  [the nozzle]
// again, break out your ruler to confirm. do the Z in the final tweaks step

#define Z_MIN_PROBE_REPEATABILITY_TEST // if you want M48 enabled

#define AUTO_BED_LEVELING_BILINEAR

// Sensor at the front-left
#define LEFT_PROBE_BED_POSITION (MIN_PROBE_EDGE)
#define RIGHT_PROBE_BED_POSITION (X_BED_SIZE  + X_PROBE_OFFSET_FROM_EXTRUDER - MIN_PROBE_EDGE)
#define FRONT_PROBE_BED_POSITION (MIN_PROBE_EDGE)
#define BACK_PROBE_BED_POSITION (Y_BED_SIZE + Y_PROBE_OFFSET_FROM_EXTRUDER - MIN_PROBE_EDGE)

#define LCD_BED_LEVELING // nice to have

#define Z_SAFE_HOMING

#define NOZZLE_PARK_FEATURE // if you enabled the advanced pause in Configuration_adv.h file

#define SLIM_LCD_MENUS // need this so the firmware would fit into the board

#define NUM_SERVOS 1

#define DEACTIVATE_SERVOS_AFTER_MOVE
Final Tweaks
You need terminal access to the printer, either the terminal tab on OctoPrint, or connect the printer to your computer and use Printrun. You should the these following steps.
M280 P0 S[angle] ; Test the servo angles. In my case, I use M280 P0 S160 to deploy and M280 P0 S30 to stow.
M119 ; While doing step 1, confirm the Z endstop status by sending It should return open when deployed, and TRIGGERED when stowed.
M851 Z0 ; Reset the existing Z-offset to zero. It should already at zero if you just flash your firmware, but just to be 100% sure.
G28 ; Home all, or by clicking on the button.
G1 X110 Y110 Z0 ; Move everything to center bottom
M211 S0 ; Disable software endstop, so you can go below Z0
Now slowly move the nozzle down until it barely touching the bed (do the paper dance).
Look at the LCD, and take note of the Z value. For example its -1.2
M851 Z-1.2 ; Set the Z offset
M211 S1 ; Enable software endstop
M500 ; Save settings to EEPROM
M501 ; Load EEPROM
M503 ; Confirm settings (unless you have this disabled)
Now, jump back to the Marlin’s Configuration.h file, set the new Z-probe offset value #define Z_PROBE_OFFSET_FROM_EXTRUDER -1.2 and save it. This way you don’t need to do this section again if you need to flash the firmware for other reason.
Finished! Also remember to add G29 ; Auto Bed Leveling right after G28 in the starting gcode of your slicer.
Bonus: after you made this, I highly recommend replacing the spring bed mount to a solid bed mount.
tl;dr Despite of all of the drawbacks, this is a tinkering man wet dream. Probably the best kit to learn things about 3D printing itself.
Last year I bought myself a 3D printer. I did my usual homework. Look for reviews, ask people who already own one, compiled a list and compare those to what’s available here in Jakarta. Because my original plan was just to dip my toes in and see if it’s something for me, back then, anything below $1000, will be a kit that I need to build my own. Pretty far from a 2D printers. So local is important, if I fuck something up, I can get parts fairly quick.
Back then, Anet was on the top of the list. It’s the cheapest one on the market, and very upgradeable. Turns out, the upgrades were necessary, not optional. Now if you punch “Anet house fire” into google, you’ll get plenty of results. The A8 has literally burn a house down, and many has fire started around the main board area. I guess I lucked out with mine.
At this point, many Anet A8 owners will not recommend this to other, neither will I. You can call this sunk cost fallacy, but man it’s so much fun “upgrading” the A8. At the beginning, I was a 3D printer virgin, I tried to watch some youtube vids, but many of the words just fly over my head. I don’t even get what they’re talking about. So I just pull it out of the box, and just follow the instruction to build it. It’s like building a pretty complex IKEA shelf.
Built it, test run, and immediately scratch the heated bed. Because the instruction for the bed leveling sensor were completely wrong. Pull the sensor out, switch back to button end stop. It was more practical, and made sense in my head. I can’t even begin to debug the sensor right? Not much to do but to go back to the button, at least I can get my head around that, Z axis goes down, hit the button, and stop. That’s the lowest point of the printer. After that, I start printing things. Mostly scuba accessories. Goodman handle, GoPro trays.
Funny thing, after I got OctoPrint up and running, it’s when I learned that the Anet is a fire hazard. Learned that I need to upgrade to Marlin firmware, but when I tried all the suggestions I found on reddit, none were successful. So I just suppress the fire warning, and kept on printing on stock hardware and firmware.
Until at one point, the nozzle was clogged. I pull it out, dunk it in acetone (best part about printing ABS, acetone is the almost cure all solution), and put it back on, turns out, I put it back way too loose, plastics come out off from the side of the nozzle. It’s now stuck on, and I can’t print anymore. Can’t even take it out to clean again. Stop printing for awhile.
Until a few months ago, all of the sudden things just clicked in my head. I need to heated up the nozzle, and just use proper tool to undo the nozzle. Clean it up, put it back on real tight this time. Everything went great. I even print better than ever. Got the thing I needed to upgrade the firmware. And then I start looking into things to Anet A8 modifications / upgrades. There were a lot of things. I started printing all those printable upgrades, ordering mosfets, new hot-end, and the extruder upgrade kit. Everything is coming on a slow boat from Aliexpress.
Bottom line, I love mine, but ultimately it comes down to this, are you a responsible person who loves to tinker? Do you want to play with the printer or do you just just want print trinkets from thingiverse? Cost aside, the answer to these questions should show whether you should get the Anet A8 or not.
Preamble: I have wrote a lot because I've been tinkering (read: breaking and fixing it back) my 3D printer. And I've just returned from my scuba diving trip to Komodo, which was out of this world. That and I'm also furiously looking into Swift UI without installing any of the beta OS. I never installed any of the beta software unless I have to.
The short answer is neither.
Package manager has been an interesting project in recent years for shippable products. In the beginning it was a brilliant way to get a tool or software installed on your preferred linux distro. For the shippable projects, I believe it was popularized by npm (Node Package Manager) for NodeJS, then others follow suit; Composer for PHP, Gradle for Java etc.
My love and hate for package manager begins and ends with npm. When I was learning NodeJS, I thought how brilliant is this npm thing?! And not too long afterwards, I realized how stupid it was to publish and rely on someone else's code without even looking into it. Glad I didn't have to learn it the hard way. I understand that the codes were open source. But I never personally check on them. And what happens if the dev decides to abandon, or literally pulled it under you? Can you make it yourself to just restore your app back to the original state?
Now back to the question I propose in the title, just so you guys understood the difference; Cocoapods builds the dependencies when you build your project. Including cocoapods means you have to use a workspace with all of your dependencies added as separate projects in the workspace, and anytime you make a clean build (or archive) you have to rebuild them all. Carthage checks out the source code and builds the frameworks independently of your project. You then add them to your project and include a script to copy them in properly. It's a much more desynchronized process.
If I have to pick, I'd pick Carthage, but again, seriously, neither. SPM (Swift Package Manager) is interesting, but very unlikely to be available for the framework or library you'd want to use. I once was offered to inherit an app that won't compile anymore, it had more than 30 "pods" in the project. Nope!