NotebookLM is an innovative tool that combines the power of interactive notebooks with advanced language models. It allows users to write code, analyze data, and generate text in a collaborative environment. For me, the standout features is the ability to summarize text, making it an ideal companion for readers looking to digest non-fiction material quickly.
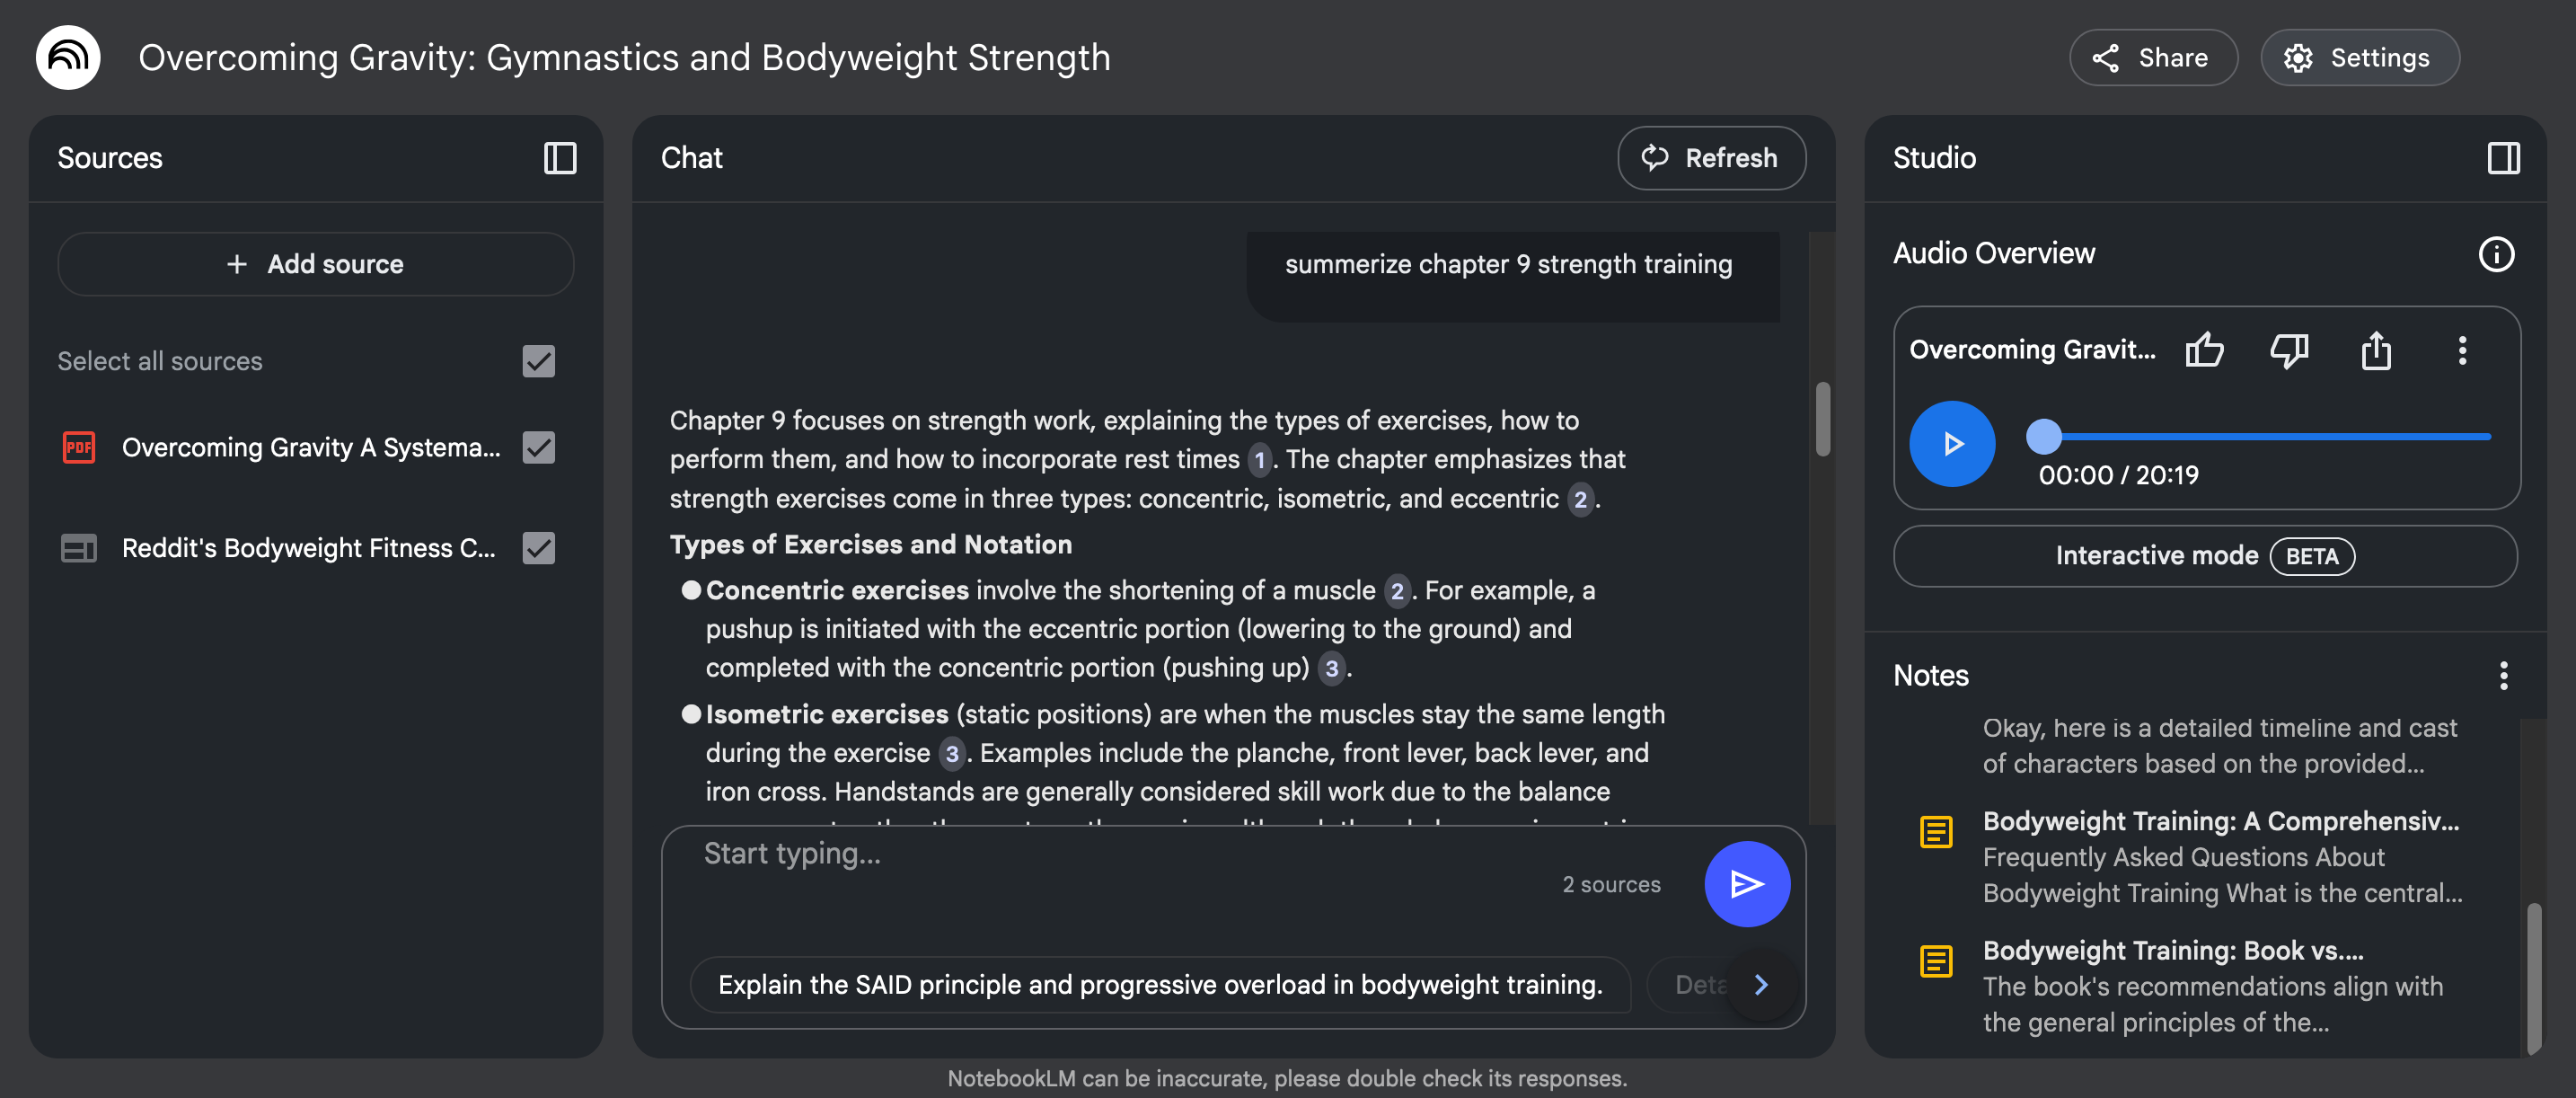
Just upload the pdf file of a book (or several books of the same subject), and start chatting. As the screenshot above, I pop on Overcoming Gravity (I believe it's quite obvious what my current obsession is), and I can start discussion with the AI. I am not a fast reader, so I just ask it to summarize a chapter, read that, and go through the book much faster. This is a game changer. I can't even imagine if I'm still in school or uni. Studying is going to be so much faster and simpler.
On the top right, there's a way to generate a "podcast" but that's very gimmicky. It could be good as the first gauge whether you'll enjoy the book or not, it's basically 20 min overview of the source book.
The only con is that it doesn't accept epub, which is my favorite format. It's basically html underneath. It's not a big deal in this case, there's an infinite amount of epub to pdf converter.
The only change is on step 4, mainly because homebrew has and odd path to store packages for M series Macs. I also added pinentry-touchid for better experience. I'll update the original post so you (well, future me as well) don't need to refer to multiple posts when configuring pass on your brand new Mac. Let's further break down the step;
First is the native BrowserPass
Download the latest release of BrowserPass -- select the darwin-arm64 version for Arm Mac.
Extract and jump into the folder
make BIN=browserpass-darwin-arm64 PREFIX=/usr/local configure
sudo make BIN=browserpass-darwin-arm64 PREFIX=/usr/local install
sudo make BIN=browserpass-darwin-arm64 PREFIX=/usr/local hosts-firefox
vi .password-store/.browserpass.json and put in
{
  "gpgPath": "/opt/homebrew/bin/gpg"
}
Next is the pinentry
brew install pinentry-mac
brew tap jorgelbg/tap
brew install pinentry-touchid
/opt/homebrew/bin/pinentry-touchid -fix
vi ~/.gnupg/gpg-agent.conf and enter pinentry-program /opt/homebrew/bin/pinentry-touchid
gpg-connect-agent reloadagent /bye or gpgconf --kill gpg-agent
ChatGPT is an advanced language model developed by OpenAI that can generate human-like text. It has been trained on huge datasets of internet texts, making it a great tool for programmers.
One of the most impressive features of ChatGPT is the ability to complete code snippets. This feature allows programmers to just provide a partial code example and ChatGPT will generate the rest of the code for them, saving a lot of time and effort. This is especially useful when working on complex projects where finding specific sections of code can be difficult and time consuming. Another great feature of ChatGPT for programmers is the ability to create documents. By providing code snippets, ChatGPT can generate detailed descriptions of your code, including comments and functional descriptions. This is very useful for developers working in teams. It helps make sure everyone is on the same page with regards to the codebase.
Additionally, you can use ChatGPT to generate code samples and tutorials. This is a great resource for novice programmers just starting to learn a new programming language or framework. ChatGPT can generate code examples that are easy to understand and follow, helping make the learning process faster and more efficient.
Overall, ChatGPT is a powerful tool that programmers of all skill levels can benefit from. The ability to complete code snippets, generate documentation, and create code examples and tutorials make it an essential tool for anyone working in the software development field.
Ultimately, for me, ChatGPT is basically a free assistant for menial things. Like looking for simple codes that I'd need to scroll through StackOverflow answers from 5-10 years ago. For example, something like "make a function in javascript to convert date object to ISO string." All the way up to "make a modern login screen in react native with a button that logs the input." Friggin awesome.
As we near the end of the year, it's a natural time to reflect on the past and think about the future. This year has been a whirlwind for me, especially with the release of Yukbid earlier this year. I've been so focused on development and improving the user experience that I haven't had much time to write blogs.
However, that doesn't mean I haven't been writing at all. This blog was supposed to be my brain dumping ground, but as the development logs became more proprietary, I realized that I needed a way to document my thoughts and feelings that was just for me. That's when I started journaling. In fact, I've found that journaling has been a great way for me to reflect on my thoughts and experiences during the development process.
Journaling has been a wonderful way for me to process my thoughts and emotions as I work on Yukbid. It's a private and personal space where I can reflect on my successes and challenges, and think about what I want to achieve in the future.
Looking back on the past year, I'm proud of all that I've accomplished with my app. It's come a long way since its initial release, and I'm excited to see where it goes in the future. As I look ahead to the new year, I have big plans for my app and my business. I'm excited to see what the future holds, and I'm committed to continuing my journaling practice to help me stay focused and motivated.
If you're someone who has struggled to find the time or motivation to write blogs, I encourage you to try journaling instead. It's a great way to reflect on your experiences and think about your goals and aspirations. Who knows, it might just become a habit that helps you stay on track and achieve your dreams.
I kinda broke v1.0 when trying to smoothout the output from the sensor, rather than rebuild and do the same thing again, I want to rebuild from the ground-up. First step is making the ADS1232 reference design almost exactly as is, especially the filters. This time I want to simplify more things, especially in terms of battery management and workflow.
The grand scheme is basically still the same as v1.0, except this time just done properly rather than cobbled together. I design, well copy, everything with EasyEDA (first time ever -- please excuse my use of auto routing). The idea was order it directly from EasyEDA to JLCPCB, but turns out they ran out of ADS1232 and I required to buy 2000 pcs. Too rich for my blood. Now I have the all the files needed to shop around other fab places. Elecrow came on top in terms of pricing and least confusing process. Email them the files, and they'll response within 24h -- simple, who'd thunk?!
This is my final kitchen scale, further build will be minor iteration. I plan on another "plate" with 3kg load cell so I can use it with pour over, Chemex, etc. Then I need to update the "screen" so it can handle multiple plate without needing to re-calibrate. In mechanical keyboards terms, this is my endgame coffee scale. Anyway, all the files and technical details is in GitHub.
You know that feeling when you broke a thing right after the first time you turn it on? That's what happened to me when I got my CNC 3018. Put most of the things together, enough to test run it, plug it to my computer, tried to connect with UGS, connected, but can't get anything to move. X, Y, Z, spindle, no movement. Dang it, DOA?!
At first I thought it's because my control board still running grbl v0.9 while most tutorial / guides I read and watched mentioned grbl v1.1, so I'd just upgrade it, right? ez pz... boy was I wrong. The flash kept failing, I kept trying by changing the parameters, up to a point I got it to flash up to 3%, then it failed. Did I brick the board? I can't get it to connect to UGS anymore. Nothing on Arduino's Serial Monitor. What do I do now? It's about dinner time, so I took a break while thinking about making plans.
Plan A was to complain to the seller and claim that it's DOA. Plan B was to use my stock Anet A8, see if I can flash grbl into it, it's a spare board that has 4 stepper motor drivers on it. Plan C was starting to look into replacement board. So, as I set plan A in motion, open a complaint ticket to the seller, I started to look into grbl firmware for Anet board. No luck for plan B, worse part I tried to flash grbl to the Anet board anyway and killed it as well.
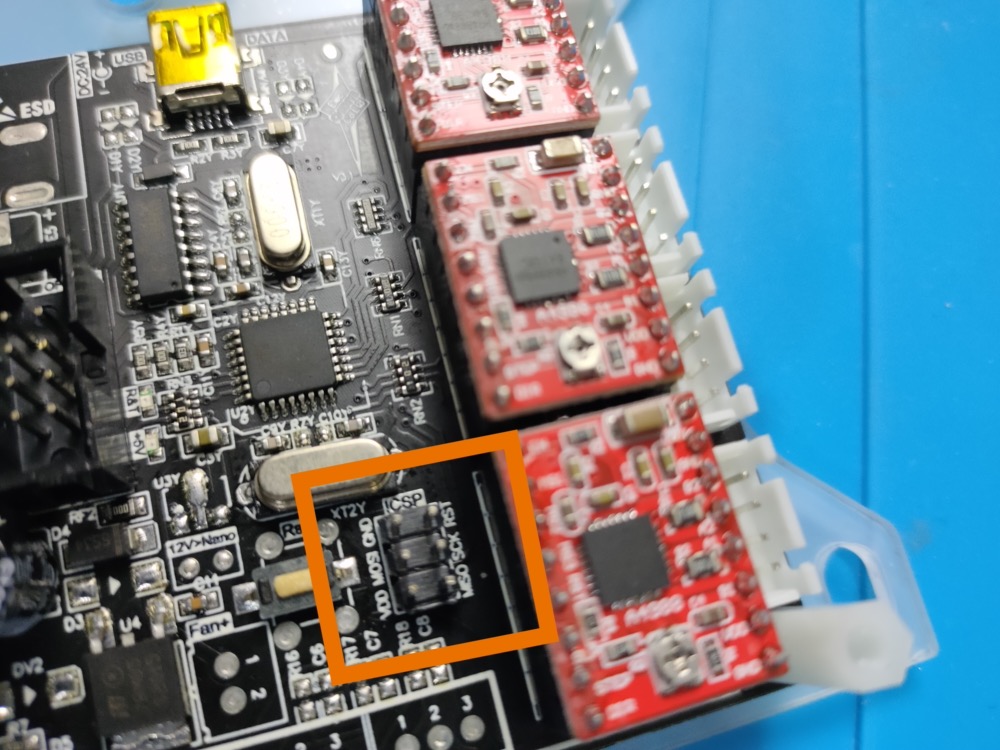
So, plan C, the cheapest grbl board I found was the Makerbase MKS DLC v2.0 -- it's about $20 without the stepper drivers. Then I realised that I never even look at which board was my CNC runing, it came with a black acrylic cover. So later into the night, it's like 3-4 am at this point, I open up the cover and try to look for a brand or something to see if it's even cheaper than the MKS DLC.
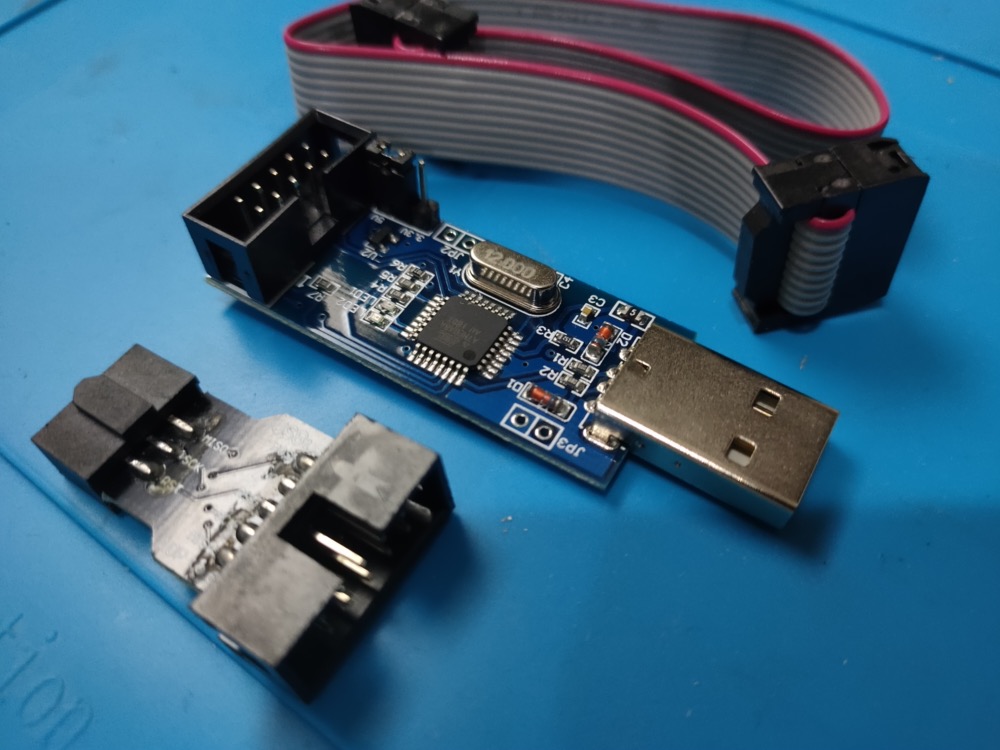
This is where I noticed two things, there's a switch for the 24V supply. That is why I can't get the stepper and spindle to move in the beginning. And, most importantly, I saw this unused, unsoldered ICSP port. And I remembered I have a thing, which turns out it's the thing I bought to burn bootloader into the Anet A8 board so I can flash my own Marlin Firmware.
So obviously, I quickly soldered header pins into it. The crystal oscillator is in the way of plugging in the adapter directly, so I just use jumper cable. Quickly flash grbl v1.1 to it. Voila! It's alive!! I also revive the Anet board by flashing Marlin v1.1.9.1 with stock A8 configuration. Soon after I cancel my complaint, the adrenaline and anger for killing a thing before even using it ceded, and fatigue came in.
Again, the USBasp programmer along with the ICSP adapter, you can get it for $2 on eBay or Ali, have it in your electronic box. You'd never know when you need it. While technically you can hack around and use an Arduino as the programmer, it's $2, get it now before you need it.
A simple project that birthed not long after I finished my macropad. With the amount of zoom meetings I've been having along with my MacBook just sits on a desk, clamshell mode, behind the screen, it'll make it easier if I can just plug my headphone directly into the desk without needing to reach around and what not.
This is a quick and simple project but you need to solder tiny wires. Here are the things you need:
TRRS cable, it can be extension cable, but you'll need to figure out how to mount it.
TRRS female connector, plate mounted if you want to use my STL
Mounting plate STL
Heat shrink tube to cover the soldering job
As you can see in the video, I made note of which pin correlates to which wire. I believe this should be universal, but feel free reconfirm this on your own.
It's almost two years since I posted my guide to PasswordStore, I still refer to that post from time to time. If you follow that guide, you'll hit this problem soon enough. Can't encrypt new password because the public key is expired. Well, here's how.
$ gpg --list-keys
$ gpg --edit-key  <fingerprint>
Use the expire command to set a new expire date:
gpg> expire
When prompted type 2y or however long you want the key to last for.
Select all the subkeys (the primary key, which we just set the expires date for, is key 0):
gpg> key 1
gpg> key 2
gpg> expire
A star will appear before all selected keys.
Since the key has changed we now need to trust it, otherwise we get the error "There is no assurance this key belongs to the named user" when using they key:
gpg> trust
Then we just need to export it again and pass it around to another computer or mobile apps.