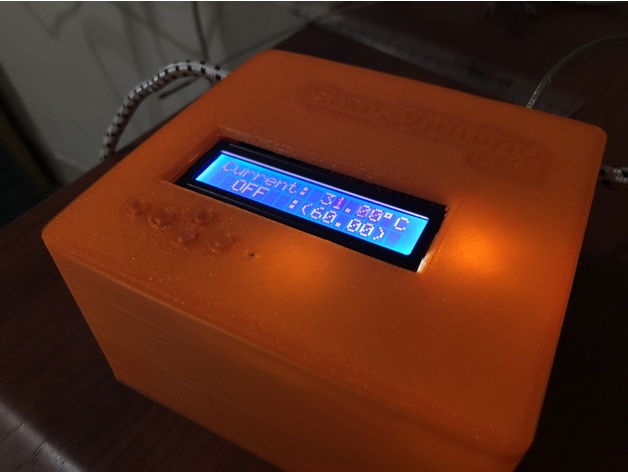
Well, not necessarily an upgrade from MK1, but more of a remake on the same thing, minus WiFi and App, but plus LCD and buttons, and now that I have a 3D printer, a perfectly fitted enclosure. It is a simplification. I can’t use the same code because the Spark folks has drop support for the Core, took me like an hour to get “blink” running on it. It’ll be faster to remake it from scratch. And using a self-signed app is annoying for others in my family that could’ve use this as well.
That said, I made this with 100% spare parts, so personally I spent $0 on this. I bought an Uno clone and LCD shield for “prototyping” purposes, but it never left the anti static bag. It is always faster to jump directly prototyping on the board I actually plan on using, zero code adjustment.
The longest part of this build is waiting for the enclosure finish printing. If you need a guide for this, just follow the Sous Viduino by Adafruit.
Links: enclosure and code. A quick breakdown on my specific setup:
- Arduino as the brain, and Uno because I want to use the LCD Shield.
- LCD shield to simplify things. I’ll have buttons for interface. Up / down to control the temp by 0.5ºC increments, left / right control by 5ºC. The set button to start and stop the PID. 1
- Temperature sensor as PID input, I use the type K with MAX6675, because I bought quite a few of it right before people jump to MAX31855. Even the DS18B20 will work as well.
- Fotek 40A SSR is fine, it’s good enough to control the rice cooker. Utter shit as a product, I wouldn’t trust it as mission critical projects, but I already have 4 of them because they’re like less than $2 each.
- And I can’t remember the exact module code for the Aliexpress AC to 5VDC module to power the Arduino from the same plug. 12VDC into Vin pin would be better, but regulated 5V into the 5V pin is fine.
Downside with this rice cooker setup that you’ll need to make sure that the temp sensor is in the bath when the PID is working or you’ll boil whatever you’re cooking in the bath. I have one occasion where the probe pop out for some reason and the water reached 70ºC when I wanted 60º.
I plan on doing something like a “thermal runaway” protection in the code like in 3D printers. See if the temperature isn’t rising after a certain time while the heater is “on”, kill everything.
Also, I saw this Anova teardown, it is so simple. That thing is literally the same as this project, but instead of rice cooker, just add a $2 submersible heating-element, and a motor to “circulate” the water. I see MK3 in the horizon, another perfect project for #CoronaCraft.
Footnote
1: This LCD Shield is terrible idea, it is super annoying to use. I'd 100% use a potentiometer to set the temperature for MK3. ↩
I recently hacked my Nintend Switch, there I tested and found out that MEGA is the fastest way I can grab large files down to my computer. And it is a totally viable replacement to Dropbox. Apparently last year Dropbox has limit the basic account to 3 devices , which I never noticed until recently.
Because for a long time, I only need 3 devices. iPhone, iPad, and my 2015 MacBook Pro. A few months ago I replaced my (very old) iPad mini to an Android device. Dropbox limitation has been annoying but I didn’t find a need to look for replacement. Now, I just got the new 2019 16” MacBook Pro, the limitation has become a deal breaker. I don’t need a large space. Only used ~5 GB out of the 11 GB I’ve obtain out of various challenges / easter egg many many moons ago.
Moving into MEGA has been painless, I just create a folder called dropbox, and drop everything there. ez pz. On most devices I just sync this particular folder. It took awhile because I have like thousands of files, after everything is synced, it is seamless. Just launch a red M app instead of the blue box, everything else remain the same, and to some extend, MEGA is better as it doesn’t try to do anything else other than a synced folder, the way Dropbox used to be.
Tom is totally on point in the video. Web 2.0 days is totally the Internet’s utopia. “It was going to be the Age of Mashups: take data and do interesting things with it.” If we’re still in the Web 2.0 days, we won’t have these many messaging services, and even if we do, there will be an app that does them all like Trillian (member Trillian? I member…).
A few weeks ago, I built and released WhatsDP. A simple tool that’ll update my contacts with the display pictures in WhatsApp, I want to see pictures instead of initials when people calls or in iMessage. This would be something trivial in the Web 2.0 days.
It started as something I wanted to do, so I look for ways / existing apps that’ll do it, closest one is Vignette. Not only that it doesn’t support WhatsApp, I have to go through every single one of my contacts and add their Instagram or Facebook account. Nope, that’s a non-starter.
And then, as a developer myself, it turns into an app idea. However, after further research, I’ve found that there’s no kosher way of pulling that info, even with WhatsApp Business API. WhatsApp Business API is only good for sending OTP and phone tree. And turns out, there are very little services that have both phone number and display pictures, think Gravatar but with phone number instead of email. We no longer live in the utopia, it'll never be widely accepted in todays world.
So here we are, I cobbled together some JavaScript to scrape some images off WhatsApp web. It works, for now, and at the very least, for me. Even if I’ll be the only user that it ever has, my contacts look so nice now. I got what I wanted at the beginning of this process.
Just because something is going to break in the end, doesn’t mean that it can’t have an effect that lasts into the future. Joy. Wonder. Laughter. Hope. The world can be better because of what you built in the past. And while I do think that the long term goal of humanity should be to find a way to defeat entropy, I’m pretty sure no-one knows where to start on that problem just yet.
So until then: try and make sure the things you’re working on push us in the right direction. They don’t have to be big projects, they might just have an audience of one. And even if they don’t last, try to make sure they leave something positive behind.
Firefox extension.
The second brain child of Appify. It started as an app idea, turns out it was impossible to do it right (as in without some weird hacks — how do you even scan a QR code on the same phone?!). The cleanest way was with a browser extension.
- You need to export all your contacts to vCards.
- Run the extension (like the video)
- Delete all your current contacts, and add the one you just downloaded from this extension — this is the scariest steps, but don’t worry… you already have a backup of your existing contacts. If you don’t delete first, you’ll end up with duplicates.
And you’re done.

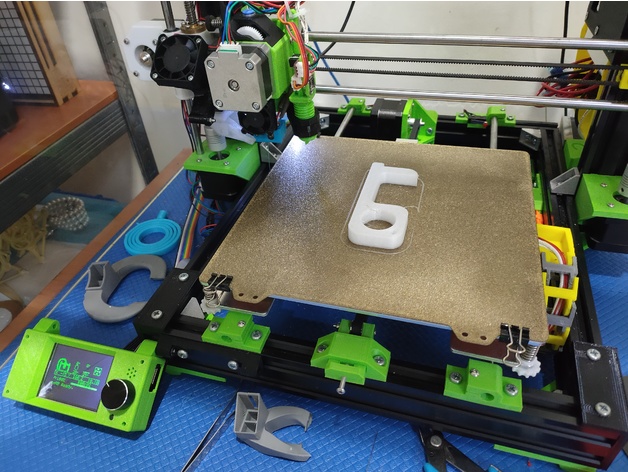
a.k.a Tiny Touch MK3, kinda. I redesign this from scratch with fusion360 (told ya I plan on something big when learning F360 a few months back). MK2 was working great until I wanted to test a different extruder, or hot end, or simply just a different extruder mount. Let’s say if I want to test a volcano heater block, I’ll need to print another mount or a different flag for it.
So, I decided to completely redesign the whole thing with the same concept. But making it compatible with 18mm probe mounts is key. A few weeks and 10+ iterations later, I’ve got it.
Now that I use SKR v1.3, I have a dedicated servo port on the board. I no longer wish to splice the power off the optical switch. This design is very simple and everyone should understand how to put things together, nevertheless, I’ve also written a complete guide on thingiverse.
![[Nintendo Switch] Convert NSZ to NSP](https://i.ibb.co/D8HKxfq/image.png)
If for some games you just can find the NSZ files instead of the regular NSP. Or you just want to download a smaller file, it’s super easy to convert it. I make this post because there are not a lot of resources online for this. My research always landed to a shoddy Windows only tool. So here we go,
- Open terminal.
- Install the NSZ tool by running
sudo pip3 install nsz
- On the Switch, launch emuMMC, and then from the homebrew tools, launch Lockpick. Once that’s done, you should have the prod.keys file in
[SD card]/switch/
- Shut down, and pop the SD card to computer. Copy the prod.keys file to
~/.switch/
Finished. To extract the the .nsz files just run nsz -D filename.nsz
Saw the ad while browsing Instagram and thought to myself, “that looks cool.” And also, “that looks simple enough to print.”
Although this is plastic, so you'll need to disinfect often. But you can get it now rather than waiting for the Kickstarter.
Thingiverse

Game Backups
Once you’ve got into Hekate (part 1), the hard part is done. To get to the homebrew menu you just need to open the “Album” on your Switch. To backup your own game just launch the NXDumpTool, pick NSP Dump, and you’re done. The file will be in /switch/NXDumpTool/NSP. This is a huge tip in finding a backup games that has fallen out of the back of the truck right on your lap 😉
Installing the backup is also as easy. Just launch Goldleaf, find the .nsp file, click install on SD card, and you’re done.
Classic Games
Again, the hard part is done. Just download retroarch, scroll down for switch. Follow the instruction video. Download some roms, and enjoy. Above is me launching Chrono Trigger, going to replay it for, I don’t know, the umpteenth time.
Bonus: Backup emuMMC Partition (aka Upgrading to a larger SD Card)
It’s a good idea to backup the emuMMC partition from time to time. It’ll also work if you want to upgrade to a larger partition. Some NSP might ruin your install. In my case it’s the SNES Online thingy. So here we go;
$ sudo dd if=/dev/disk3s2 bs=1m | gzip > Desktop/emummc.gz
Change /dev/disk3s2 to the partition of the emuMMC (check it using the Disk Utility.app). To restore to a new disk (or a broken partition);
$ diskutil unmountDisk /dev/disk2s2
$ gzip -dc Desktop/emummc.gz | sudo dd of=/dev/disk2s2 bs=1m
It’s super easy but the process takes forever.
That’s all. Fairly easy, super fun project, especially if your Switch has been collecting dust for awhile. Enjoy.